If you’re hoping to transform or improve your outdoor spaces, you’ll know how important it is to make informed choices about the landscaping materials you use.
One option that stands out for its aesthetic quality and all-round versatility is slate.
Slate chippings are small, flat pieces of natural stone slate that have been split into thin layers.
Ranging in size from just a couple millimetres up to approximately 40mm, slate chippings require next to no maintenance, won’t break the bank and are able to complement both traditional and contemporary architectural styles.
Why slate chippings?
Naturally beautiful
Slate is a natural product that varies in form, texture and colour, and it’s this variation that people often find so appealing.
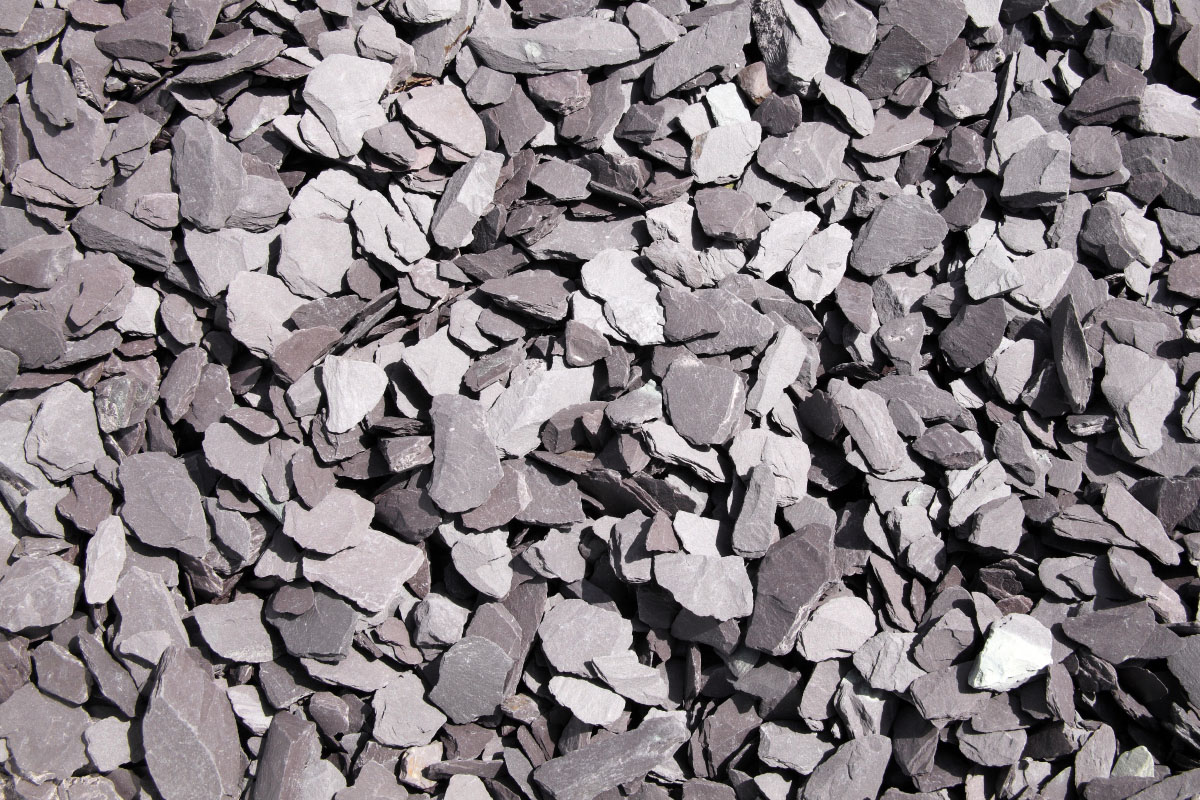
While you should expect a bulk bag of blue slate to indeed be blue, you should also expect to see a multitude of different hues of blue, as well as tighter and looser grains, thicknesses and shapes.
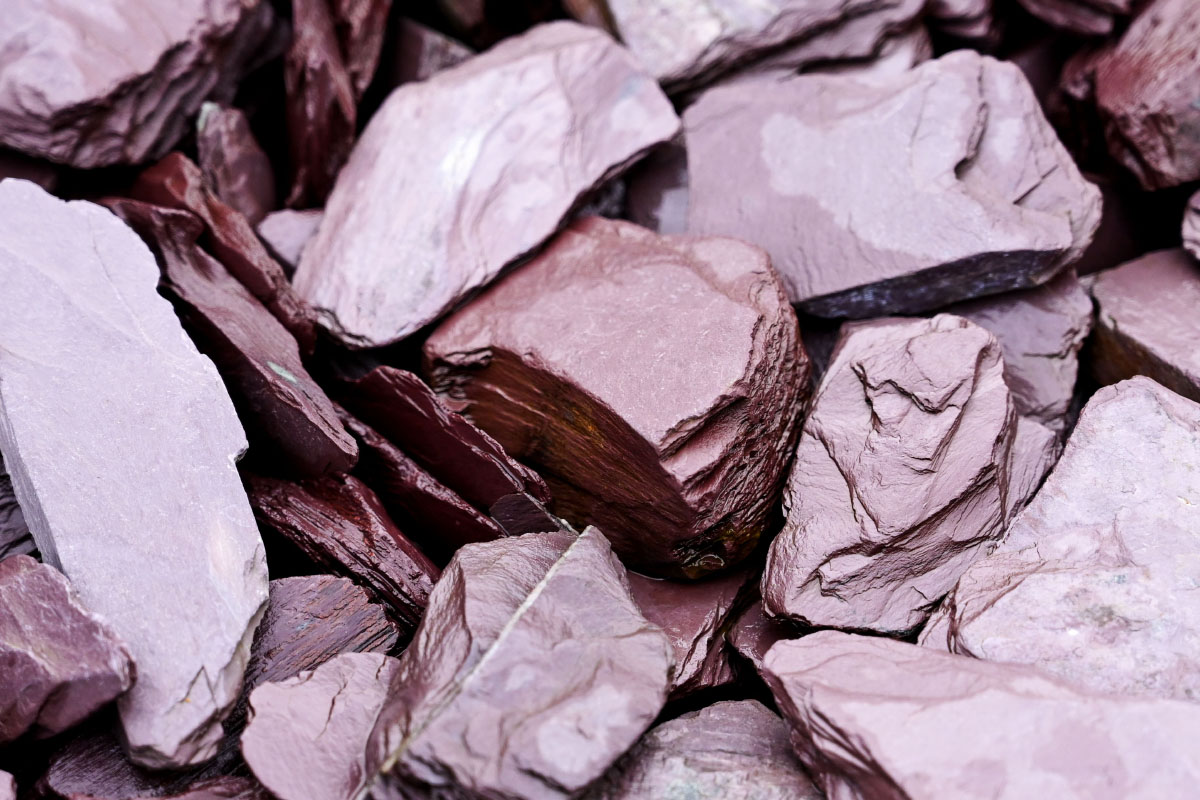
And blue isn’t the only colour available. Grey, green and plum slate are other options you could go for, as well as everything in between.
These variations are partly the result of differences in the mineral composition of the material. For example, iron-containing hematite imparts a reddish hue to slate, whereas chlorite tends to turn slate green.
When the heavens open and your slate is soaked by rainfall, it will look different again, with the colours deepening and the material taking on a shiny appearance.
Durable
Slate is robust and extremely durable, which explains its widespread use as roofing, cladding and flooring material in the construction industry, where it’s expected to last up to 200 years.
Slate is also colour-fast, non-porous and is unaffected by adverse weather.
Thicker slate chippings can even be used as a driveway or path surface, but it’s worth bearing in mind that in high traffic areas it’s likely that slate will break down into smaller fragments.
Environmentally friendly
Slate is extracted across the UK, with working quarries or mines located in Wales, Cumbria and Cornwall. This widespread availability means that the product rarely has to travel far to reach the customer.
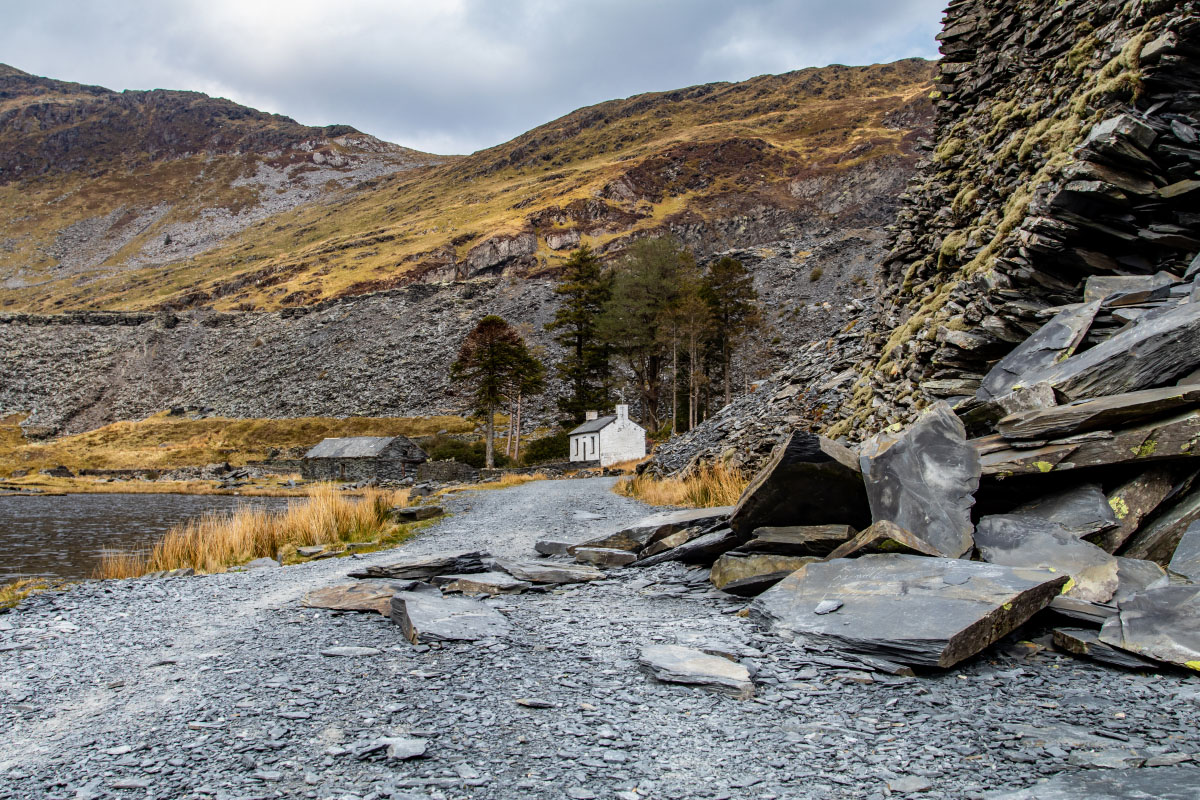
Slate is also recyclable, and in fact many types of slate chippings are recycled from roof or floor tiles.
Due to being a natural material, the production of slate is fairly simple and no furnaces or toxic chemicals are required to prepare it for sale.
Water is used extensively throughout the process to suppress dust and to assist with drilling, cutting and splitting slate, but efforts are increasingly being made to manage resources more responsibly.
Easy to lay, even easier to maintain
One of the benefits of using slate as a decorative aggregate is how easy it is to lay.
Some preparation is almost always necessary when laying any type of stone aggregate, something we’ll cover in detail later, but laying slate chippings is much more affordable and less time-consuming than laying block paving, for example.
In terms of maintenance, slate tends not to encourage the growth of moss or algae, so it’s not necessary to regularly pressure wash areas that have been dressed with slate chippings.
An occasional check for fallen leaves and germinating weeds should do the job.
Driveways and footpaths that receive heavier than normal traffic may begin to look a bit patchy after a while, but this can be easily rectified with a quick top up of chippings.
There’s no need to clean slate using harsh chemicals. Acidic substances in particular can tarnish the stone surface.
Where to use slate chippings
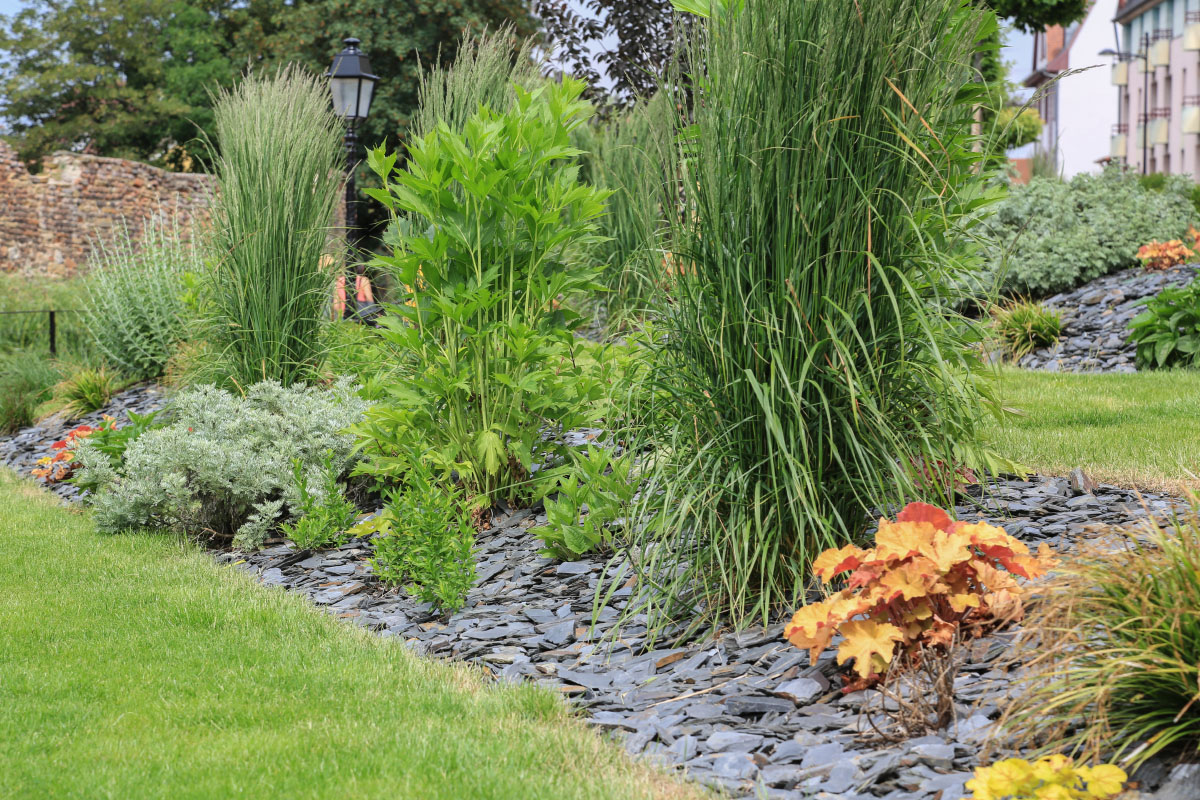
Flowerbeds and borders
Unlike some chippings, such as limestone and Cotswold buff, slate is a more or less chemically inert material that won’t significantly change the pH value of soil or other growing mediums
This makes it a great choice for top dressing flowerbeds, borders and other planted areas.
You can even use slate chippings around lime-hating species such as rhododendron, azalea, camellia and magnolia.
Chippings also help with water retention in soil, allowing water to reach the growing medium and reducing evaporation during warmer weather.
They’ll reflect light back on to your planting to encourage growth, and because light is being prevented from reaching the soil, the germination of weeds is discouraged.
A thick enough layer of slate with overlapping chips can prevent weeds from growing even without the use of weed membrane, and those few weeds that do manage to find a way will often be leggy and easily removed.
Another advantage of top dressing with slate chippings is that a layer of slate can work to regulate the temperature of the growing medium throughout the seasons.
So in the colder months the slate will absorb heat from the sun, and that energy will then be gradually released into the soil below.
In winter the slate will prevent excessive heat from directly reaching the soil.
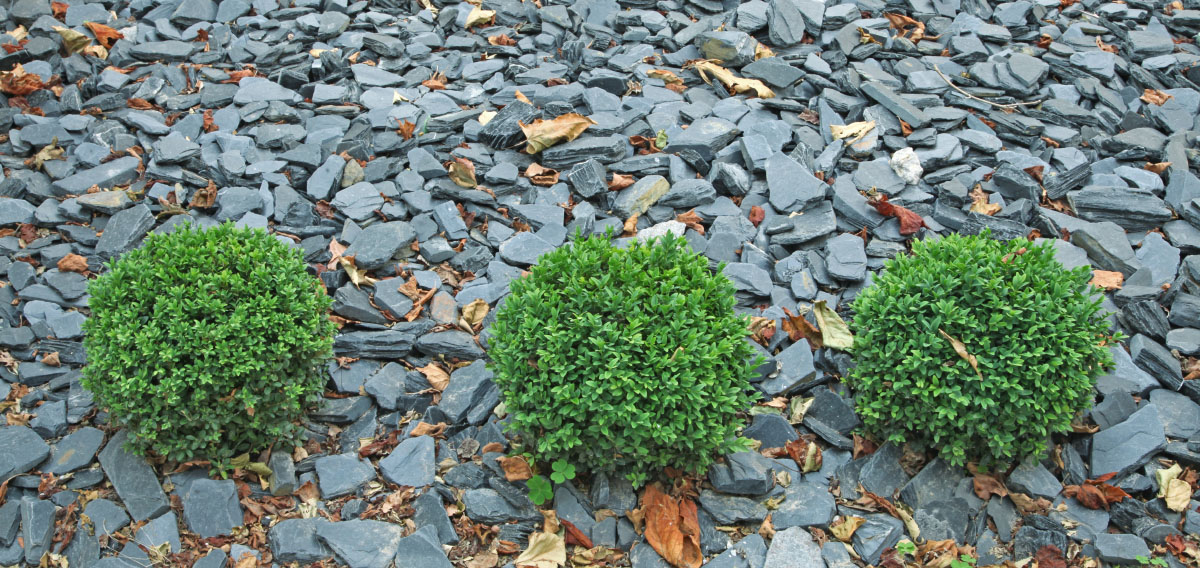
Aesthetics is another important consideration, and bright flowers or vibrant green foliage is set off beautifully against the stunning blue, grey, purple and green hues of natural slate.
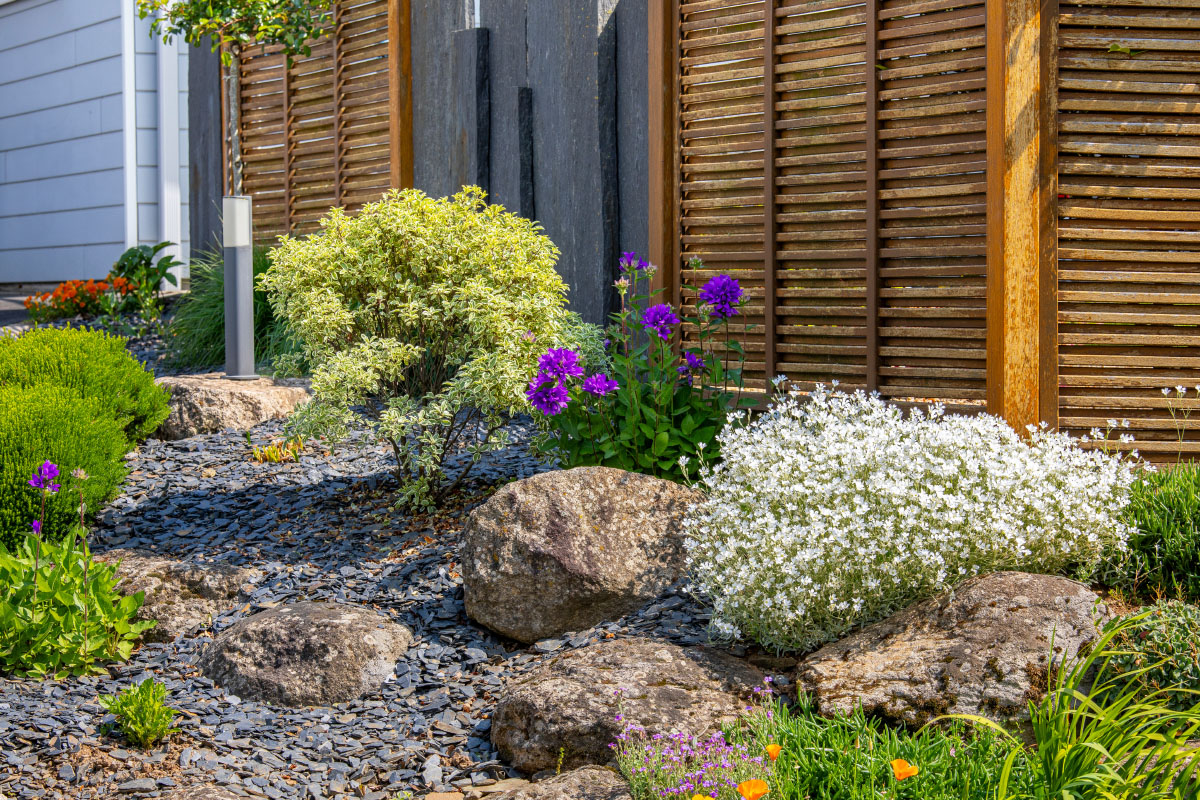
Rockeries
Slate chips make a great choice of aggregate for your rock garden for much the same reasons that they work so well for beds and borders.
20-40mm slate chippings combined with large slate stones in matching hues can provide a captivating backdrop to your planting due to the striking contrast between the slate and green foliage or flowers.
This is especially true in wet weather when the colour of the slate deepens and the surface of the aggregate begins to shine.
The non-porous nature and angular shape of slate chips also encourages water to drain freely rather than be absorbed or pool on the surface, which is ideal for rockeries as drainage is important for many of the plant species used in a rock garden context.
Succulents and alpines in particular look great planted amongst slate chippings and larger rocks.
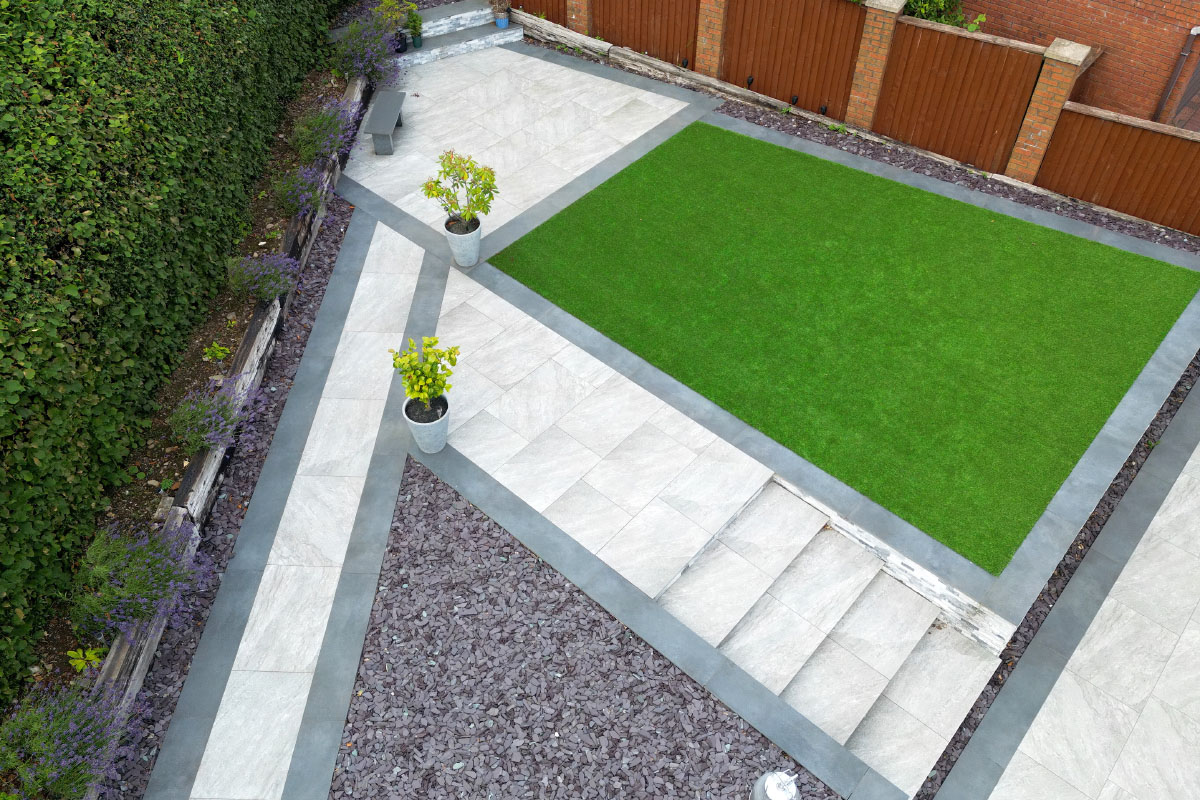
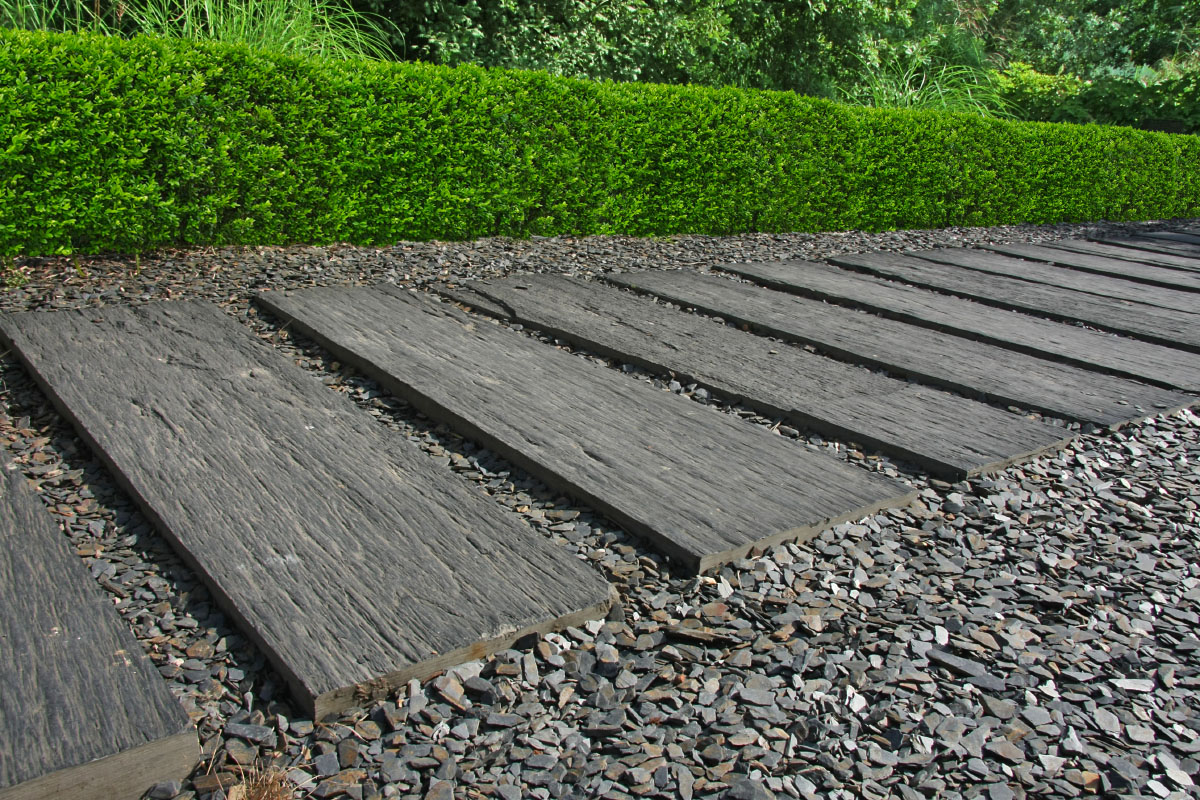
Footpaths
The angular form typical of slate chippings allows them to interlock, offering a flat and stable surface for garden paths.
You should have no trouble finding a colour that complements the design of your home and garden.
When choosing slate, consider how different coloured chippings will contrast with the brick or stonework of your home, as well as how the slate will set off your planting throughout the seasons.
A curved path of blue-grey slate chippings, edged with granite setts, will take on the appearance of a flowing stream (even more so when wet). And it’s an affordable, easy-to-lay option where there’s no need to compromise on aesthetic quality or durability.
We’d recommend 20-40mm chips for higher traffic areas as these tend to be thicker and more hard-wearing.
Between paving stones and in gaps
Even the smaller, more affordable chippings can be used for lower traffic paths or where they’re placed in between paving stones, as these paving stones will deal with the vast majority of the footfall.
If you want to go all-in on our favourite decorative aggregate you could even use slate for these larger stones, but other natural materials such as sandstone, limestone and granite make great walking surfaces.
We’ll cover this in more detail later, but it’s important to do a little digging to ensure your slate sits slightly lower than your lawn or other surfaces, as this prevents chippings from going walkabout and being ingested by your lawnmower!
You can also use slate chips to fill gaps in between patio slabs, with the same principles applying as above.
Be sure to choose a slate that complements your patio, and have the slate sit lower or at least flush with the patio surface. That way people walking on the surface won’t displace the material and it won’t end up looking untidy.
Water features
We mentioned earlier that slate is a relatively inert material that doesn’t leach minerals or significantly effect pH levels in soil.
This applies to water features as well, so there’s no risk to aquatic life, including fish, amphibians and plants.
We do however recommend thoroughly washing your slate before placing it into ponds or in and around other water features. This will remove any slate dust and organic matter that could have a negative impact on water quality and clarity.
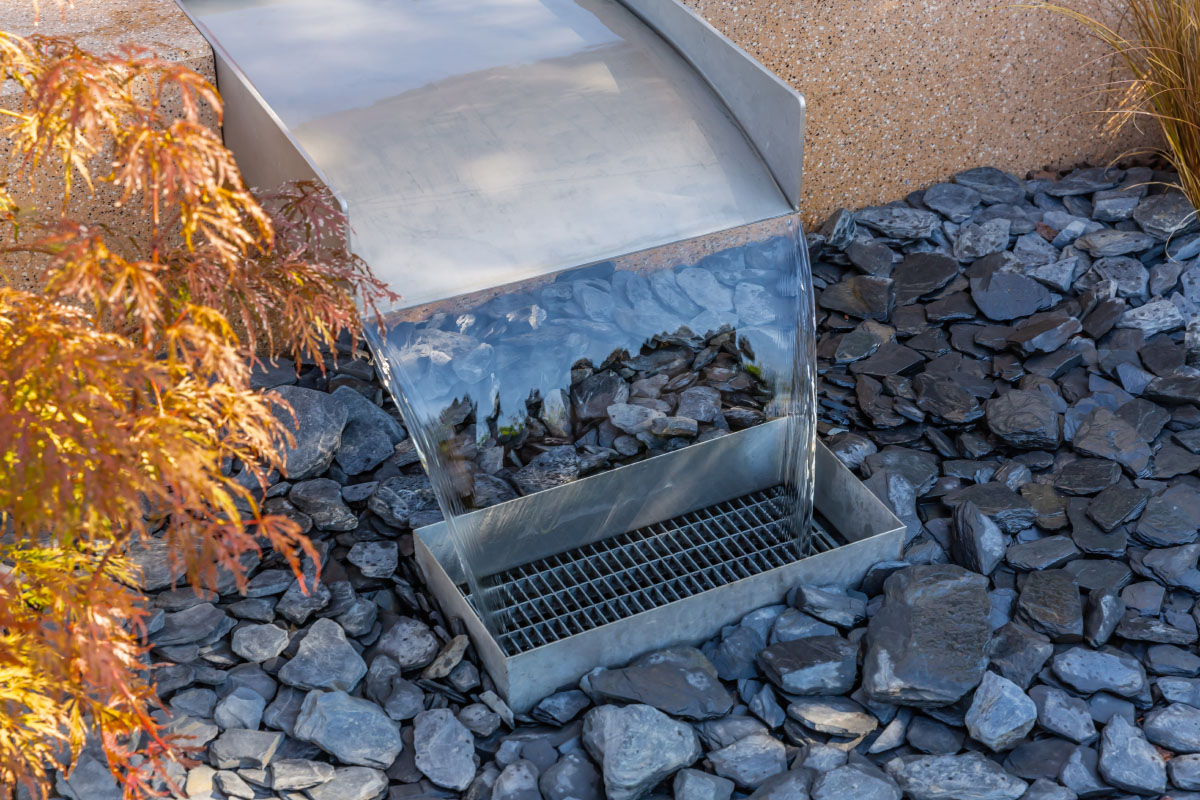
Where water falls onto your slate you get to benefit from the aesthetic qualities of wet slate — those deep hues and the stunning shiny finish.
Larger slate rocks are often used in water features in conjunction with slate chippings, and in fact some people add slate rocks to their indoor aquariums, which is testament to the material’s suitability for use in aquatic environments.
Create a fire pit area
Fire pits are currently all the rage and are available in a dizzying array of shapes and sizes.
Depending on the design of your garden, slate could be the perfect accompaniment to other hard landscaping around your fire pit, used in much the same way we suggested between paving stones.
Slate is also naturally heat resistant, so it’s a material suited to use directly underneath a fire pit.
Plum or purple slate with its warm, reddish hues could be the ideal aggregate to use, as it will mirror the rusted or tarnished finish of the inside of the fire pit, and of the fire itself.
Mulch
Slate mulch usually consists of 4-16mm slate chips that are a byproduct of the manufacture of larger chippings, or are produced when recycling slate roof tiles.
Using slate in this way will help retain moisture in the growing medium and regulate heat throughout the season.
As mentioned earlier, the slate will also reflect light back up to your plants, encouraging growth.

Unlike other materials used for this purpose, slate won’t be blown away in heavy wind or displaced by wildlife, so it’s the tidier, lower maintenance option.
Many people are inclined to use woodland mulch or ornamental bark to regulate soil moisture and heat, but this isn’t suitable for some plants as these materials absorb moisture and then remain in contact with plant stems for long periods.
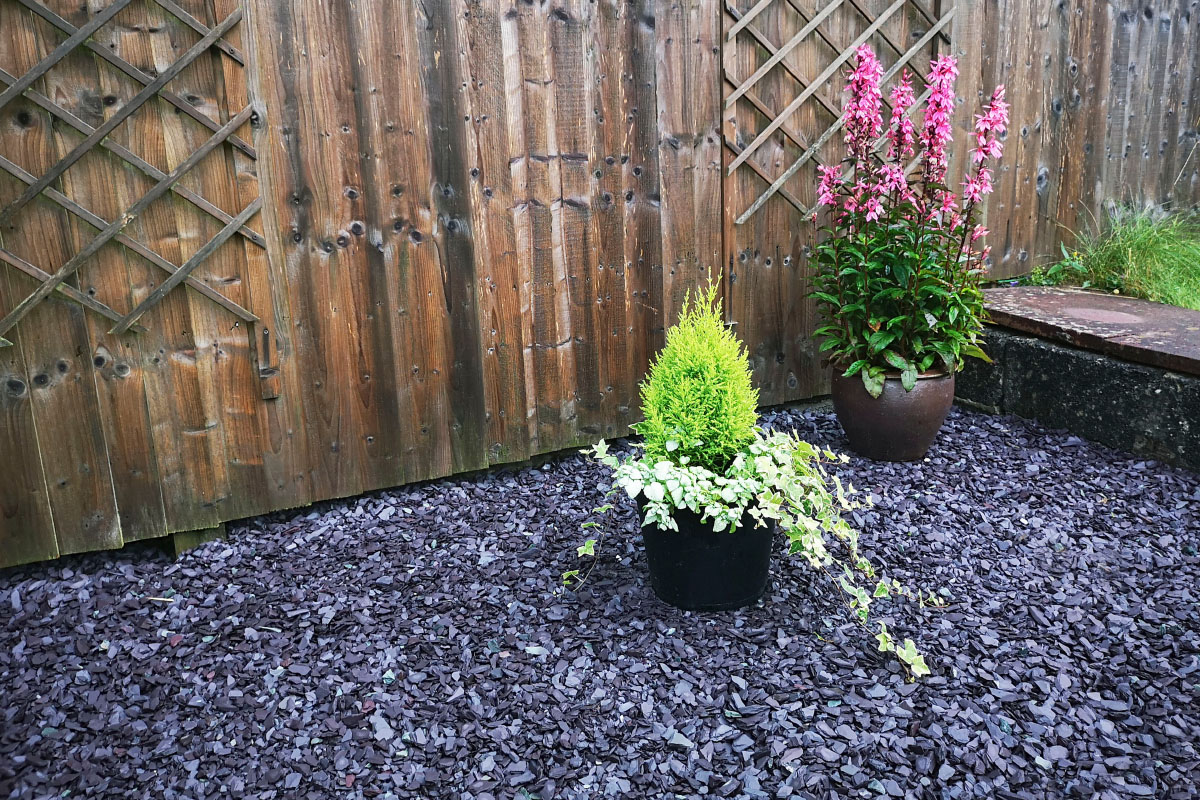
Topping material
If you can use slate chippings as top dressing for flowerbeds and borders, there’s no reason you can’t use them in pots and planters to do much the same work: retain moisture, regulate heat, reflect light and prevent weeds from germinating.
The choice of multiple colours should allow you to find slate chips that complement your pots.
Concrete planters are popular in gardens that have a contemporary look, and blue-grey slate is the perfect accompaniment to this material.
Smaller 10-20mm slate chips are perhaps more suitable to this application, particularly if you have smaller containers or intend to use slate indoors. Yes, even house plants can benefit from the practical versatility and aesthetic qualities of natural slate!
Containers can also be placed onto slate chippings, and as long as they’re not regularly moved around, even relatively heavy pots and planters won’t cause noticeable damage to the slate.
We’d always recommend thoroughly washing the product prior to using it as a topping material, to reduce the chance of introducing disease or pests to your existing plants.
Driveways
Slate chippings aren’t always recommended for use on driveways due to their tendency to break down when driven on, but this concern tends to apply to the thinner slate chippings you can buy rather than the chunkier 40mm aggregate that’s better suited to use on driveways.
As long as you prepare the base of your driveway and perhaps use some form of discreet edging or decorative border, a slate chipping driveway surface can be a stunning, low maintenance option that lasts many years.
Edging or a decorative brick border is recommended to prevent slate from straying from the constraints of your drive, and a hexagonal plastic driving grid can also help, particularly if your driveway is on a slope.
All that said, if your driveway is likely to receive a lot of traffic, or indeed if you own large or particularly heavy vehicles, then there are better options than slate.
A resin or tarmac surface may be more appropriate in these circumstances, but there’s no reason you can’t use slate in a decorative context, surrounding your driveway.
How to lay slate chippings
This may sound obvious, but how slate chippings are laid is very much dependent on their intended use, and particularly how much foot or vehicular traffic they’ll receive.
When using slate as a top dressing material, you can generally get away with just thoroughly washing the chippings and placing them as you would ornamental bark, or other similar material.
If you’re building a flowerbed or border from scratch, we’d recommend using heavy-duty weed membrane to make certain that weeds can’t get established in the growing medium.
Using discreet plastic edging, railway sleepers or decorative bricks is also a good idea to ensure that your chippings don’t stray too far.
If you’d rather not have such a defined edge to your borders, you can dig deeper where border meets lawn to ensure the topping material sits low and stays put.
Laying a slate footpath or driveway
Surfacing a garden path or driveway with slate chippings is a bit more involved, and preparation is key, but it’s still a much simpler process than many other forms of surfacing.
Let’s get into it.
Step 1: Choose the right slate chippings
Practical considerations are most important here.
Small or very large slate chips aren’t normally suited to use as a path or driveway surface.
Slate mulch or 4-16mm chippings are likely to get stuck in sneaker soles and car tyres, and will break down quickly in heavier traffic areas.
Likewise, 20mm chips tend to be too fragile for use on driveways, but make for a flat, stable walking surface such as a garden path, unlike larger paddlestones that can be more difficult to walk on.
40mm is the ideal size to use when surfacing a driveway, as these chippings tend to be thicker and more robust, so won’t break down when driven on to the same extent that smaller chippings do.
In terms of aesthetics, you should pick out a colour that you think would complement the design of your garden and the other materials used nearby.
Bear in mind that planting looks different throughout the seasons, so consider how the slate will work at different times of the year.
Step 2: Calculate how much slate you need
It’s important that you accurately measure the area you’re planning to cover, using a tape measure or perhaps even the distance measurement tool on Google Maps.
Assuming the space is a fairly simple shape, you’d just need to input those measurements into a quantity calculator, along with the depth of material you need.
20mm slate is best laid 4-5cm deep, and 40mm should be slightly deeper at 5-6cm. This is because larger slate chips tend to leave bigger gaps and so a shallow layer of material may not completely cover the sub-base.
If your space is a more complicated shape, try to break it down into separate rectangles and do separate calculations, before adding those figures together.
Step 3: Prepare the ground
As is true in many DIY contexts, preparation is key!
If you cut corners here, you may end up with an unstable walking or driving surface, leading to an unsatisfactory end result.
Mark out the area you’re going to resurface and start digging, using a shovel for smaller areas or a mini digger if you have a very large area to excavate.
Paths should be dug to around 10cm (4″), driveways to around 14cm (5-6″).
Next up, you need to create a stable sub-base for your slate using Type 1 MOT. This is a cheap aggregate with a rough consistency that compacts well but is still water permeable, which will prevent water from pooling on the surface.
MOT at a depth of around 5-8cm before compaction will do the job.
You can compact smaller areas with a hand tamper, larger areas with a whacker plate or trench rammer.
Once the MOT is firmly compacted, lay a heavy-duty geotextile weed membrane across the entire area. Where there are gaps, cut and overlay smaller sheets to ensure complete coverage. Fix the membrane in place using steel fabric pins pushed down into the sub-base.
Do not use plastic bin bags as these are not water permeable, and will prevent water from draining away from your paths or driveway.
If you want to adopt a belt and braces approach, a plastic gravel grid may be a good idea on driveways to prevent your slate from straying onto the highway, particularly if your driveway slopes.
Step 4: Install the border
Now that your sub-base and weed membrane are in situ, you may wish to install a decorative brick or steel border to create a delineation between lawn or other surfaces and your new slate path or driveway.
While not absolutely necessary, this is an attractive feature that may also help to keep slate chippings where you intend them to be, and keep them away from the lawn mower or strimmer.
Step 5: Lay the slate chippings
The fun part — pouring and spreading the slate chippings into the space you’ve so diligently prepared.
Using a metal garden rake, distribute the slate as evenly as possible, and then check the depth using a ruler or tape measure.
If the finish of the slate seems dull or dusty, don’t worry, this is just the slate dust that was produced when the aggregate was transferred to bags and while you were raking it into position.
You can either wait for a decent downpour to wash away the dust, or hose down the slate if you’d rather not wait too long to see your new garden path or driveway looking its best.
Maintaining slate chippings
Slate chips are hard-wearing and require next to no maintenance.
However, we’d recommend that you inspect your slate for weeds every few weeks, particularly in spring and summer.
Removing weeds should be straightforward as the slate will have prevented them from establishing strong roots, so they should be quite leggy and therefore easy to pull out.
You can remove leaves from slate by hand or using a leaf blower, ideally at regular intervals in autumn, especially if your slate sits under deciduous trees. Once leaves start to break down they can be more difficult to remove.
If your slate is particularly badly soiled you can use a pressure washer on a low setting, but don’t use any cleaning agents and particularly not a cleaning agent that’s acidic. Acid is one of the few substances that can tarnish the surface of slate.

If areas begin to look patchy due to slate breaking down or being displaced, try to match any new slate with the existing aggregate, but bear in mind that it won’t be from the same batch and some variation is likely to occur. You could always spread any new material out amongst the older slate, so that differences in hue, shape or size will be less obvious.
Frequently asked questions
Slate chippings are well suited to being placed directly onto soil and other growing mediums as top dressing or slate mulch.
When using slate as top dressing material on beds and borders, you may wish to install heavy-duty weed membrane underneath your growing medium to be more confident that no weeds will germinate.
Yes, but with caveats.
Thicker, more robust chippings should be used for high traffic paths and driveways as they’re less likely to break down compared to thinner material that snaps more easily under pressure. Smaller, sharper chippings could also damage tyres, but you shouldn’t encounter this issue with a larger aggregate such as 40mm slate chippings.
Weeds will always try to find a way, but even without a geotextile weed membrane, if you lay slate chippings deep enough very few weeds are likely to grow.
One advantage of laying slate chippings without a weed membrane is that bulbs such as hyacinths, daffodils, crocuses and tulips will normally be able to grow through the slate while the vast majority of weeds will struggle to do so.
Slate is a non-porous, natural material that encourages water to drain freely, reducing the likelihood that it will pool on the surface.
This is why slate chippings are ideal for use as mulch or top dressing, as they regulate the temperature of the soil while nonetheless still allowing water to reach the growing medium, and they also help reduce evaporation during hot spells.
Grey, blue, purple (plum) and green, as well as variations in hue around these colours are the most commonly available.
Slate is a natural product and these characteristic colours are the result of the mineral composition of the stone, as well as the processes involved in the formation of igneous rock, which occurred over a period of several million years.
Slate is colour-fast and will not fade over time, although in areas of heavy traffic, slate dust may form and settle, obscuring or lightening the colour of the stone until it’s washed clean.
Likewise, if slate becomes heavily soiled or is exposed to acidic substances, the surface of the stone may in rare cases become dull or change in appearance.
Unlike some aggregate, for example polar white pebbles, slate tends not to be affected by the growth of moss or algae and therefore shouldn’t require regular cleaning.
If you’re using slate as mulch or top dressing, or in and around a water feature, we’d recommend thoroughly washing it.
You can do so by using a cheap plastic bucket and drilling holes in the bottom, then spraying the slate with a hose.
This process will remove slate dust and any contaminants that may be detrimental to plant growth or aquatic life. In rare cases, organic matter, disease or pests may have contaminated the slate prior to it reaching you, but a thorough wash should deal with this.
If you’re concerned that your slate looks dull or dusty when freshly laid, you can either hose it down to remove any slate dust, or wait for a decent downpour to do the job for you. The latter approach is the more environmentally friendly option!
For the purpose of this question we’ll assume that your bulk bag is a large tonne bag (1000kg).
Coverage depends on how deep you intend to lay the aggregate, but for most garden applications, 4-5cm is adequate. In which case, 40mm slate at a depth of 5cm will cover 12m2.
You can use a quantity calculator to get a more accurate idea of how far a bulk bag can go.
Slate is a naturally quarried or mined product, so the process of extracting the stone is somewhat resource intensive.
That said, the production of slate doesn’t involve the use of furnaces or harmful chemicals, unlike some other landscaping materials.
Slate chippings are also recyclable, and are often produced from roofing or flooring tiles removed from buildings. Rather than just discard the slate, the tiles are broken down into chippings and sold as high-quality landscaping aggregate.
Slate is better suited to being laid on an existing hard surface compared to rounded or sub-rounded aggregate, but this still isn’t a great idea.
When you lay any type of aggregate on a concrete, tarmac or similarly hard surface, there’s no ‘glue’ to bind and stabilise the stone. Slate chippings will move freely on such a surface, resulting in aesthetic issues such as patchy areas and slate chips far from where they’re supposed to be.
In a worst case scenario the path or driveway will be unsafe to walk on, but this issue is more commonly with smaller, rounded aggregates.
Read our guide on how to lay slate chippings for valuable insight into how to do the job properly.
Unlike lighter coloured gravels and pebbles, such as golden gravel or polar white gravel, slate chippings tend not to encourage the growth of moss or algae. That means they rarely go green or require cleaning, but if you really do feel it’s necessary to clean your slate, a pressure washer on a low setting should be adequate.